Friday, March 9, 2012

Country Bookcase Goes Coastal

The dining room is our next room overhaul.  Mom left her Asian-inspired dining room set and an old country style bookcase here when she moved since her new dining room was smaller.  The bookcase has been a good dumping ground for stuff that doesn't have a place because I could just close it up. 


I was getting tired of looking at it and was going to post it on Craigslist. Then I got to looking around on Pinterest, my new obsession place for ideas. I was inspired to transform this dated piece into something coastal.  It is laminate and wood and I wasn't sure about painting it so after some digging, I found a post by Centsational Girl on painting laminate furniture.  Well, that was that. I didn't like the hanging leaf trim at the top and I thought I could just unscrew it off but it was tacked and glued.


I took it off and asked Hubs if he could just cut it off.  Sure enough, that is what he did.


I liked the floral carving on the doors, but they weren't very beachy. 


I decided to buy some wainscoting to put over them.  Hubs cut 2 pieces out so that they fit right over the carved wood door.  We attached them with some brad nails and wood glue, filled in and sanded the nail holes, caulked around the edges and the wainscoting was ready to be primed and painted!


The door you see above the double doors used to be a pull down desk.  I had intended to put it back on but after taking it off to paint, I decided I liked it better without.  We had to fill in the hardware holes and sand it down. 

Rather than getting new hardware, I just primed and spray painted them with some Satin Nickel spray paint I had left over from another project.


I used 2 coats of Zinsser's primer, 2 coats of leftover paint from our kitchen/dining room for the back of the bookcase and 2 coats of leftover flat white ceiling paint for the rest of the bookcase, then followed it up with 2 coats of sealer. 


Here is what it looks like now. 


Quite the transformation, don't you think? 


         BEFORE                                 AFTER
 
See it decorated in the Decorating My Coastal Bookcase post.


Linking up to:


The Humble Brag Supporting Habitat for Humanity

Sunday, October 23, 2011

Switch Flops - Best Thing Since Sliced Bread

Last year, I walked into a home and garden store and discovered Switch Flops.  If you haven't heard of these before, I insist you check them out!

WARNING:  You will want to buy these.  Many, many pairs of these.

It's basically a shoe with interchangeable straps or buttons.  Genius!  I started my new obsession around my birthday, so Hubs bought me 3 pairs (black Lulu, tan Lulu, and black Lily) with a few extra straps.  Then the store I got them from had a sale a few months later and I picked up the cork Emma and a few more straps. 

I'm not quite sure how I ended up with so many straps (ahem), but I got tired of sifting through them in a pile on my shoe shelf.   I decided I needed an organizer for them.  They sell them online, but I wanted something really pretty to display my collection.  I found a pattern for a wrapping paper organizer and modified it slightly to the size I needed and added strips of Velcro instead of pockets.  I think it turned out really well.  I have it hanging in my closet, but it also folds up easily for travel.

This is the front with a large pocket made out of coordinating scraps.


Here is the organizer opened up with some of my Switch Flop straps.


This is the back.


I love how it turned out!

Friday, October 21, 2011

Living Room Update

I decided a few weeks ago that I want to bring some beachy-ness to my living room.  It's currently decorated with tropical accents, which I love, but I want to brighten it up and go coastal. 

I started with the easy stuff like updating the pillows on the couch.  I went to Joann Fabrics and found some indoor/outdoor fabric for half off in a pretty turquoise with a subtle stripe pattern.  Then I found some fabric called Sportswear Twill, also half off, in an off white.  I measured my existing tropical pillows and got to work.  I made a total of 4 pillowcases, 2 in the turquoise fabric and 2 in the off white fabric with some accents and bling (rhinestones).  Oh, how I love bling!  ;) 

While browsing the Internet, I found some really pretty turquoise coral pillows, but all the ones I wanted were over $50!  So rather than spend that much on pillows, I made pillowcase covers to go over my existing pillows.  I Googled a coral outline that would not be too difficult to cut out, copied/pasted it into Paint, printed it, then cut it out.  I pinned it to a scrap piece of turquoise fabric and cut it out.  After I cut it out, I used Fray Check around the edges.  It needed a little something extra, so I added the rhinestones to some tips of the coral.  I then used Liquid Stitch to adhere it to one of the off white pillows I made.  I wanted to add a real starfish to the other pillow (something I saw in another blog), but Hubs said he didn't want to lay on a starfish.  After I explained to him that they were not to be used (blank stare), I went ahead and cut a starfish out of the off white fabric and added some bling to it as well.  I used Liquid Stitch to adhere it to my turquoise and off white pillow. 

Before:


After:


I really love the way they turned out. 

Next, Hubs and I worked on creating some wall art.  Back sometime this summer, while spending countless hours looking through blogs, I came across an awesome piece of artwork that Kari from The Sunset Lane created using pallet wood and paint.


We wanted to make 2 of them, with the seahorses facing each other, which would go on both sides of the mirror over the couch.

I spotted some pallet wood outside a warehouse a few weeks back, but after reading some warnings on them, I decided to pass and go for some cheap pine planks from Home Depot.  I bought 4 planks, 4x8 feet long each for a little over $16.  I had Hubs cut them down to 3 feet each, use the remaining pieces for the backing, and put them together for me.  I used black stain that I had left over from the porch furniture.  I only used 1 coat to give it a somewhat aged look.  I copied and cut out the seahorse image that was on Kari's blog, but it was too small so I basically traced an inch or so outside the pattern using chalk.  For the second one, I traced the seahorse from the first one with tissue paper, flipped it around and made it a tad bigger, one to symbolize Hubs and the other myself.  ;)  I used left over paint from the garage for the seahorses, which is a light turquoise.  Hubs added some hooks and wire to the back and up they went!


Here is what it looked like before with the tropical wall art. 


Here is what it looks like now.


If you look in the mirror, you will see the existing mantle.  I'll be working on updating that next.

Saturday, October 8, 2011

Still Here!

Wow, it's been almost 5 months since my last post.  I'm such a slacker!  I had a wonderful summer off from house updating and sewing, but it's time to get back into the swing of things.  We still have a few things to finish up on the garage, but hopefully this month, we will be done and can move on to something else.  Hubs cut all the baseboards and shoe molding but still has to install them.  He is having an issue with the trim work around the doors and windows because nothing is ever as easy as it should be. We may have to get a carpenter friend of ours to come over and finish that up for us.  Most of the curtains are made and just have to be hemmed. 

I decided I want to turn the living room from tropical to beachy.  There is a lot of black furniture in there, but I figure if I can make a billiard room with dark furniture look beachy, I can do the same for the living room.  I will start another post on my progress soon.

Tuesday, May 31, 2011

Our Home - Exterior Transformations

I have lived in this house since 1989 when my mom and I moved here from Utica, NY.  In 1999, I bought this house from her and she bought one 4 houses down the street.  Since then, I have been turning the house into my own.  I'll take you through some of the transformations.

Here is the front of our house when Mom and I first moved in.


Here is the front of our house just after Mom moved out.


Mom had the large tree in the front cut down, replaced it with some perennials and planted 2 maple trees. I added the willow tree to the middle of the garden box (it was only about 4 feet tall in the picture above, but grew to be about 15 feet tall) I had gotten from a trade on GardenWeb.  She also replaced all the windows and shutters and had a concrete patio poured on the front porch where it used to be a mini garden.

After the willow tree in the front died for some unknown reason to me, I removed it and the surrounding garden box. 

We had our first daughter in 2007 and decided we needed more space.  Rather than moving, we decided to expand.  We thought about building up, but the cost was extremely high, so we decided to expand out.  We drew up a plan to add an additional 6 feet to our den, 2 bedrooms, a linen closet and a wiring closet.  When we got our addition done in 2008 (there will a post later on that), we also got a new roof, new siding, black shutters and replaced all the brown trim with white.   In 2009, we decided to expand our driveway to a double and replace the concrete porches and walkways with pavers.  We also replaced all the chain link fence with a wood fence. 

I wanted an additional walkway from the driveway to the front porch and a seat wall on the back patio, so we had the same company come out and do that in 2010. 

In the front of the house, after the new driveway and pavers were installed, I removed the existing garden wall (I installed them in 2002) that bordered the front garden and changed the shape.  I also created a new garden bed between the porch and new walkway.

Here is what the front looks like today.


Here is a picture of the back of the house when we first moved here from New York.  Plain Jane, right?


Here is a picture of the back yard a few years after Mom moved out. 


Mom planted 2 fig trees in the back and I added the mini patio.  When we got our addition, we had to remove the fig trees.  That was a very sad day, however, the contractor we hired lives out in the country and was able to save one of the trees for his property.  I sure miss those figs, but I don't miss the flies that constantly hung around them.

Here are some pictures of the back yard right before the addition went up.


Here is a picture of a fallen fig tree. (sniff sniff) 


Here are some pictures of the back yard today.  Much better, eh?


We added the play area for the girls last year.  Even though it is small, they love playing out there.


See the red barn looking shed in the back corner?  Total eye sore, isn't it??  Well, we are hoping to have a larger shed built that matches the exterior of our house sometime this year if we can ever finish up the garage. 

Sunday, May 22, 2011

Funky Matilda Jane Knock Off Ruffle Pants

A girl that goes to school with my daughter had on some adorable clothes one day so I asked her mom where she got them. She told me it was ordered from a Matilda Jane trunk show.  I Googled it when I got home and found some impressive clothes with even more impressive price tags!  I fell in love with these pants.  Aren't they the cutest pants EVER???


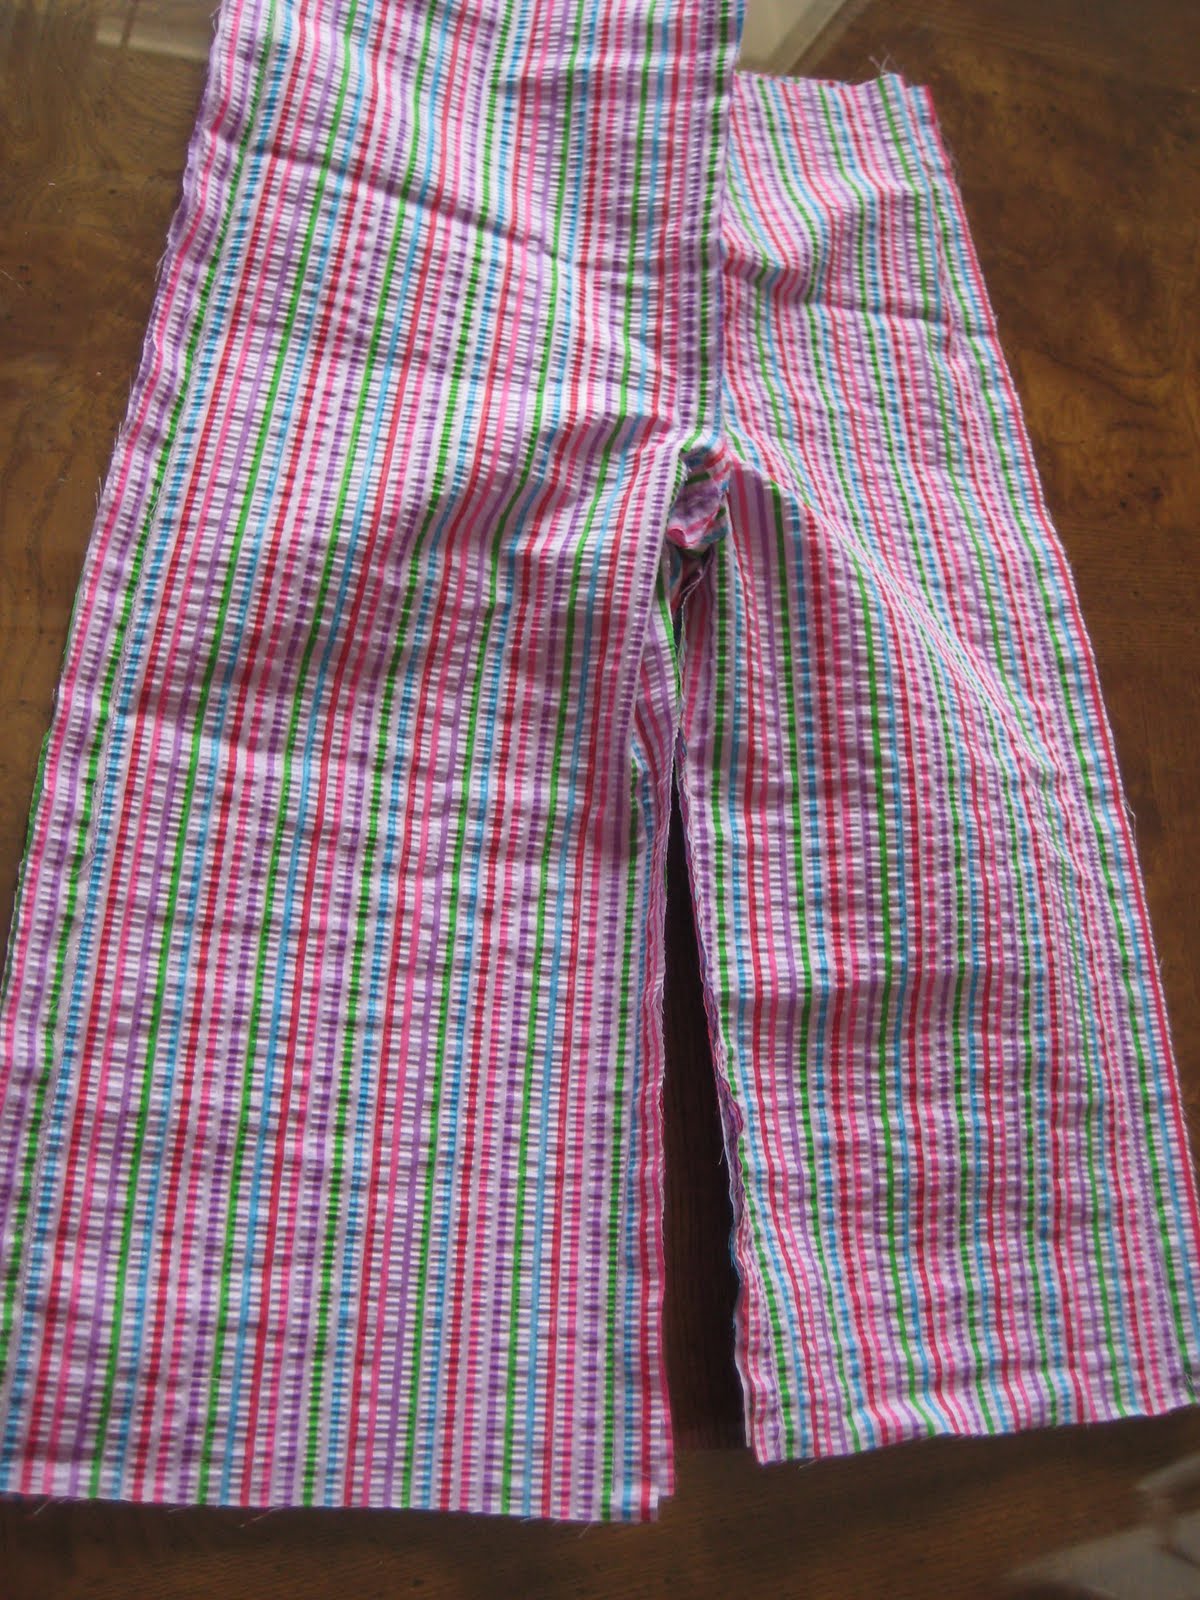
My mother-in-law had been teaching me how to sew recently, so I sent her an email to see if she thought we could make these.  Her answer was, "Absolutely!"   The fabric on the Matilda Jane pants appear to be a knit cotton, but I wanted something fun and colorful, so I picked out some adorable seersucker fabric from the Tutti Fruitti collection at Hancock Fabrics.  I made a pair for each of my daughters, and I'm making another one for my cousin's daughter. 

Basically, I just followed a pants pattern and cut off about 4 1/2 inches from the bottom of the pattern to make room for the ruffle. 


In order to create a poofy ruffle, rather than one that just laid flat, I cut a rectangular piece of coordinating material that was 10 inches by 20 inches, then folded the material lengthwise to be 5 inches by 20 inches.


I sewed the two ends together, then I sewed it together lengthwise so the fabric would not move while I was hand ruffling.


I pinned the seam of the ruffle to the inner seam of the pant leg, then pinned the folded edge to the outer edge of the pant leg, right side to right side.  I had to pull the ruffle through the pant leg so that I could manage the fabric of the ruffle better.

I gathered and pinned each ruffle.


After hand ruffling, I sewed the pant leg to the ruffle.


  Repeat for the other leg and VOILA!!


Here are my princesses wearing their new ruffle pants with matching tops!  What do you think??


I wonder if I could pull off this look...  ;)

Tuesday, May 10, 2011

Baker's Rack Refresh

I refreshed my Baker's Rack in the kitchen on Mother's Day while Hubs and the girls were napping. 
Here is what the baker's rack looked like before:


The justice scales are really distracting!  I picked it up for $5 from a garage sale during one of my bargain hunting weekends, but I decided to take it apart and use it for parts!  I used one of the scales as a bowl, then turned the other upside down to give some height to one of my seashell jars.  Since the scales were black, I used 2 coats of RUST-OLEUM Primer, then spray painted them with Heirloom White.  I still haven't decided what to use the base or balance of the justice scale for, but I'm sure I'll think of something. 

I added the Beach frame, which is a new frame I received for Mother's Day.  I already had the 3 candle holder/vases, the starfish and shell.  The bowl with the seashell on it is from the justice scales.  I really like the wood texture on the bowls.


And this is the other bowl turned upside down.


I found a box of sand dollars I had found a long time ago in a beach in Florida. I had to spray paint them white because I tried to bleach them at one time and they turned a nasty yellow.  I used one of the larger sand dollars with sand from a local beach in an apothecary jar I picked up at a thrift store for .55.  The other jar pictured is a pickle jar with twine wrapped around the top and a seashell I found tied to it. It has other shells/coral bits that I found once upon a time.  The small square frame is one I had purchased a while ago with a picture of St. Thomas from one of the many cruises we have been on.


This large apothecary jar was also from a thrift store and was only $1.49!  I found a shell necklace to wrap around the top and filled it with the remaining coral bits I had.


I made this shadow box frame from a Melissa and Doug zoo magnet box.  I painted the top edge with white acrylic paint, then glued some shells I had to the bottom.  Then I placed a Photoshopped picture that Hubs made with the Footprints poem and our daughter running on the beach in Kitty Hawk, NC.


I got this fan from EBay to put in my garage/laundry room. Hubs still hasn't replaced the cord on it, but I'm really in no hurry, as the room is NEVER going to be complete.  I picked up the handheld antique mixer at an Antique Mall for $2.95.  I just thought it was cool.